Tuesday, May 24, 2011
Pizza Perfection.
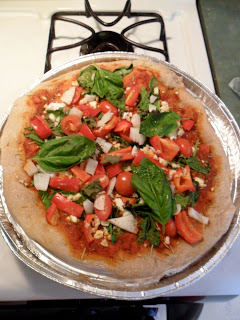
In the words of my Mother, "this is seriously, the best pizza I've ever eaten." With that being said, homemade pizza is more work, but also more delicious than your average take out pie. It's not the actual hands on work that's the killer, but rather the wait. It takes at least 2 1/2 hours from start to finish, but most of the time is dedicated to letting the dough rise. I got the recipe for the dough from allrecipes.com, (http://allrecipes.com/Recipe/amazing-whole-wheat-pizza-crust/Detail.aspx), but made a couple slight changes. As far as toppings go, I would go with what you have in the fridge which is what I did. As long as you have some veggies, cheese, and sauce, you can top a pizza.
Here is what you will need in order to make the dough. It's uses whole wheat flour as well as all purpose, so it is also a bit healthier than its' take out counterparts. It also is enough dough to make two pizzas, unless you like a REALLY thick crust. I made 2 pizzas, and the crusts were still pretty thick.
Homemade Whole Wheat Pizza Dough:
1 teaspoon honey
1 1/2 cups warm water
1 Tablespoon active dry yeast
I Tablespoon Canola Oil
1 teaspoon salt
2 cups Whole-Wheat Flour
1 cup All-Purpose Flour
Equipment:
2 Large Bowls
Measuring Cups
Measuring Spoons
Dish Towel
First you want to add the water and the honey to one of the bowls. I used honey instead of white sugar, since I try to use as little refined sugar as I can, but that's my preference. Whatever sweetener you have/use will be fine. Stir to dissolve the honey. Then sprinkle the yeast into the water, and let sit for 10 minutes, until it turns foamy. If it doesn't foam, you're yeast is dead. :(
While the yeast is activating, I got the next set of ingredients together. I mixed the salt and oil together in a small bowl and set it aside.
Next, I measured out both of the flours, and set them aside. I use a flexible cutting board for the flour, so when you scrape off the excess flour from the top of the cup, it is easier to just bend the cutting board, and pour the flour back in the bag.
I also took the other bowl, and sprayed it with non-stick cooking spray. If you don't have any spray, brushing the bowl with oil will works as well.
Once the yeast is activated, add the oil mixture and stir. Then add the flours and stir until a dough starts to form. The dough will still be sticky, but don't worry we'll fix that in the next step.
Once you have a dough formed, turn it out onto a generously floured surface. This is when it starts to get messy. Be warned that the majority of your kitchen will be covered in flour when you're finished. But it's so worth it!
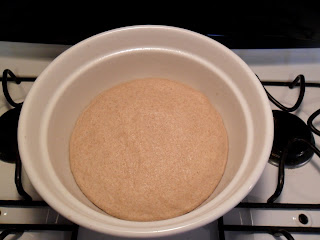
You now want to flour your hands as knead the dough, making sure all the flour gets incorporated. Continue knead for about 10 minutes, until the dough is smooth. Don't be afraid to add more flour to your board, and your hands to prevent the dough from sticking. Sorry there's no picture for this part, it was a bit messy, but here is what your dough should look like after all the kneading. If you have a stand mixer, feel free to use it instead of kneading. It should take the same amount of time, I just like to get a little arm work in. And I feel more accomplished knowing I put all the effort in.
Now put the dough into your greased bowl, and cover with a damp towel to prevent it from drying out. Put it in a warm spot for about an hour, until the dough has doubled in size. Now if your house is rather chilly, I have preheated my oven to the lowest setting for about 5 minutes then shut it off, and let my dough rise in there. Just make sure its not too hot, or else it will kill the yeast, so only preheat for a few minutes on the lowest setting.
If you have some chores to do around the house/yard, now is the time to do it. Believe me, if you're not occupied you will be tempted to keep peeking at the dough to see if it has changed yet, and that hour goes by SLOWLY.
Once your dough has doubled in size, cut it in half, and roll the two halves into balls. It's time to repeat the waiting game. Add the dough back to your bowl, cover, and let rise for another 45 minutes. This is why it takes so long! But remember, it's worth it!
In the last twenty minutes of the rise, I start to prep the toppings for my pizza. I didn't take a picture of this part, but again use whatever you have on hand, or that you want on your pizza. Like I always say, be creative! If you need some inspiration, my toppings consisted of :
-leftover pasta sauce
-crumbled feta & goat cheese
-minced garlic
-spinach
-sliced cherry tomatoes
-chopped red pepper
-chopped onion
-fresh basil leaves
You can also preheat your oven to 425 at this point. I had some disposable pizza pans on hand, but any baking sheet will work. Just spray them with cooking spray, or brush with oil.
Once your dough has doubled again, take one ball of dough, and roll it out on a floured surface. Then put it on your baking sheet, and stretch to fit. Repeat for the second ball of dough.
Add your toppings, and bake for 16-20 minutes, or until the cheese has melted, and crust is browned.
Voila! You have just made your own Pizza! Give yourself a pat on the back, but not before you dive into your perfect pie. You deserve a slice straight from the oven for all that work.
I hope you enjoy the process of making your own pizza dough. A lot of the store bought doughs contain trans fat, so making your own is always healthier. If you have the time to do so, I suggest making it from scratch. It also allows you to control what to put on, and can be much cheaper than take-out. Just like many other of your ( and mostly my) favorite indulgences can be sinfully nutritious!
Labels:
bread,
Dinner,
whole wheat
Subscribe to:
Post Comments (Atom)


No comments:
Post a Comment
Note: Only a member of this blog may post a comment.